Showing posts with label garden. Show all posts
Wednesday, 27 November 2013
Wholesome Food - pizza sauce
Remember how I keep going on about tomatoes? Well, I'm still going on.
In October I stripped all of the reasonably sized green tomatoes from the vines and put them all in a tray in my kitchen window, hoping that at least some would ripen before they started to go off. I had NO IDEA how long tomatoes keep. It's now the end of November and I'm pretty sure they're *all* going to ripen and we've been able to continue working our way through our own fresh home grown tomatoes the whole time.
We're kind of old people. Every Friday we have a pizza night. Up until a few months ago we would buy frozen pizza and put extra goodies on it. One night I made pizza from scratch, and we've never looked back.
On our pizza from scratch, I put home made pizza sauce. As I've waxed poetic in the past, tomato sauce made from roasted home-grown tomatoes is like nothing else. Seriously.
So, here's how I do it...
Ingredients:
Tomatoes - preferably larger ones
Salt
Olive oil (optional)
Garlic(optional)
Basil (optional)
Anything else you think would be nice like chili, onion, other herbs (optional)
You see it is obviously a complicated recipe.
Wash your tomatoes and remove the stems.
Drizzle with a little olive oil if you want to, pop on a baking sheet and bake at about 180c for about 20 minutes or until the tomato skins have split and started to brown, and some of the liquid has evaporated.
Remove from the oven and allow to cool enough to touch.
Remove the skins and put the tomatoes into a pot. Use a potato masher or other to mash them up a bit. Cook off the liquid until it's the desired consistency. While it's cooking add your garlic, or onion or chili or whatever else. If you're using fresh basil I'd recommend putting it in at the end to maintain the fresh flavour. Salt to taste.
Et voila, simple, fresh and tasty pizza sauce.
Wednesday, 20 November 2013
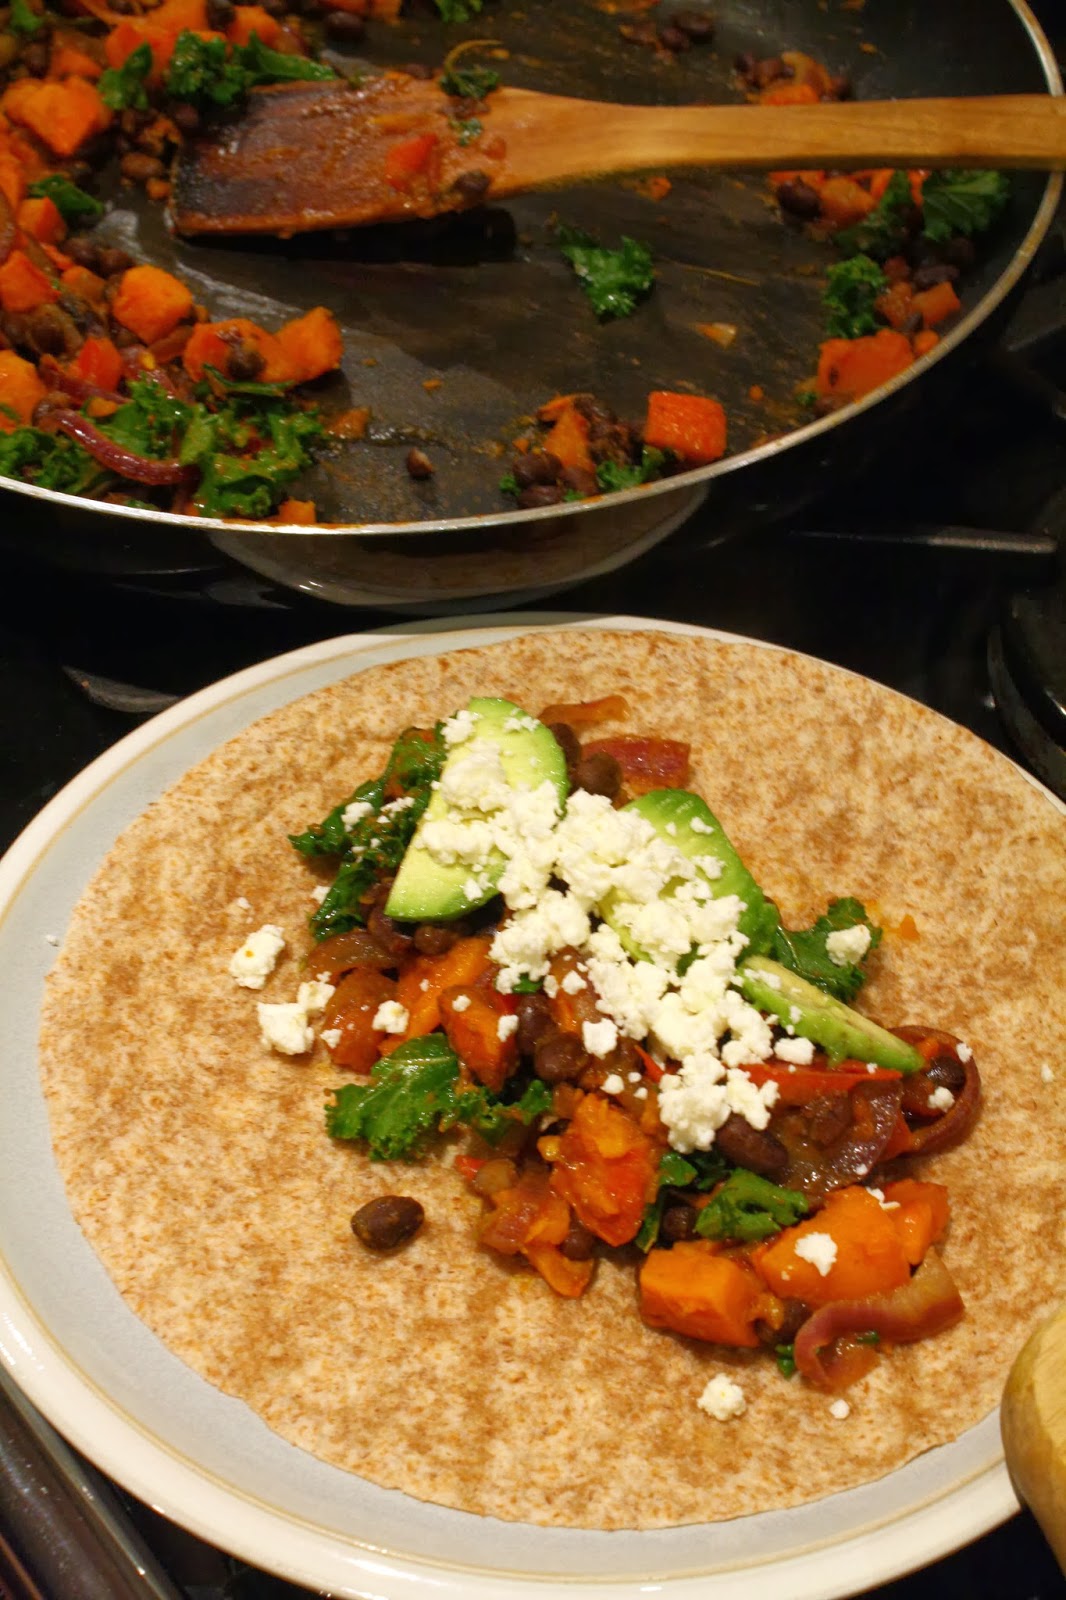
Wholesome Food - Autumn Black Bean and Squash Tacos, with kale and feta and other tasty business
We were recently in the States for my brother's wedding, in DC. We decided to make a bit of a holiday out of the trip so after the wedding we went north to Boston to visit my friend Katy. Katy, being world-wise, took one look at us on arrival and asked if we wanted to stay in for a home cooked meal on our first night with her.
YES PLEASE, we responded.
She then asked if we would be ok with something vegetarian, suggesting black bean and squash enchiladas.
OMG, we responded.
Katy and her husband Kevin contribute to a CSA (Community Support Agriculture) which means they pay a lump sum in January towards supplies for a local farm, and spend most of the rest of the year picking up weekly (or fortnightly?) boxes of tasty produce. Very similar to our veg boxes here, except that we pay for each box individually.
Katy and Kevin have become very creative in how they use their glut of produce, treating us to fabulous pickled carrots and showing us a drawer full of jarred tomatoes for future sauces, and inventing brilliant recipes like black bean and squash enchiladas.
They also mentioned a favourite recipe involving kale and goats cheese tacos. So, with a glut of kale in the garden, and some gorgeous kabocha squash in the store, I got to thinking.
Up until my eye-opening experience with Katy, I have to admit that my squash adventures were limited to the butternut variety. Butternut squash is great, but kabocha appealed to me due the description of a less sweet, nutty, almost chestnut flavoured skin. It seemed ideal as a main component to this dish.
However, I also knew that roast squash and fried onions are two sweet ingredients, so I thought that feta and sour cream would provide a good bit or salt and sour to balance the sweet.
I purchased whole wheat tortillas because I really wanted corn but couldn't find any - they were a bit on the large side so made these more burrito-ey than taco-ey, but actually the whole wheat was another great flavour addition.
The recipe, serves 2-3 with no sides:
1 kabocha or squash of your choice. You can eat the skin, so be sure to wash well. Alternatively, remove the skin before roasting.
1 large red onion
2-3 leaves of curly, or other thin-leafed kale
1 small tin of black beans
Whole wheat tortillas
Feta, avocado, and sour cream/creme fraiche to taste
Start by quartering your squash and removing the seeds. If you don't want to eat the skin and it's a thin-skinned variety, remove the skin using a veggie peeler, before cutting. If you use a thick-skinned variety you can just leave it on during roasting and scoop out the insides when it's done.
Drizzle olive oil over your slices and roast at 180c for about 20-30 minutes, flipping to ensure maximum caramelizaion half way through.
While the squash is roasting, assemble your other ingredients.
Fry off the onion -I prefer thinly sliced into crescents - for a few minutes, then add your (drained and washed) black beans and torn up kale. Remember to separate out the tough stalk of the kale before adding it in.
When your squash is ready, take it out of the oven and allow to cool enough so it's comfortable to handle, then dice up and add to the onion/bean/kale mixture. At this point you will want to start heating your tortillas as well - either in the microwave, on the stove top, or however you like to do it.
Add your squash/black bean/kale/onion mixture to your warm tortilla and top with avocado, feta and sour cream/creme fraiche. I decided not to add salsa but that would probably be a nice addition. You can certainly play around with the ingredients.
I thought the dish was brilliant, though also found that the creme fraiche addition was absolutely necessary as it would have been rather dry without. Rab liked it but this is definitely an "Emily meal" more than a "Rab meal"
Sunday, 6 October 2013
Growing Tomatoes - store bought grow bags or greener self-filled reusable ones?
Look at those tomatoes. They're all different colours, shapes, sizes and flavours and THAT is why I grow heritage.
In previous years I got my tomato plants from my father in law, but this year I decided to grow my own from seed and compare two different growing methods - using a pre-filled grow bag, and using a self-filled reusable grow bag. You will see the pre-filled ones in the front in the picture below, and the reusable ones behind them.
I put our own compost in the reusable bags, along with various fertilizers. The theory was that I would grow the same plants in the back (reusable) and front (pre-filled) and compare their progress. On the other side of the greenhouse I planted (in reusable bags) my father in law's choice of tomatoes.
From the start, the plants in the reusable bags took off. The soil was deeper so they got better root growth and didn't dry out as quickly. Over time, though, the pre-filled plants caught up.
In terms of yield, this is where my experiment fell down. I couldn't be bothered to weigh out the yields of each method, though I think from eyeing it the pre-filled bags produced more tomatoes. This could also quite possibly have been down to the fact that they got more TLC due to being easier to access than the reusable row in the back.
*note to self, don't plant two rows of tomato plants
What is MOST interesting is that my father in law's plants didn't produce nearly as much as my heritage plants. If you go back to the picture at the top of this image you will see quite a few Black Russians (the ones with a bit of green on them), a couple of Brandywine, and some Tigerella. There may be a few of the FIL's hybrid tomatoes there, but not many.
So, while the jury's still out on which grow bag method to use, I know I'll definitely be sticking to heritage tomatoes in the future.
Monday, 30 September 2013
Tomato glut
Between our (much belated) wedding reception this past weekend, and the work on the house, my tomatoes have been pretty neglected. It has been dry here which means I've not had my usual bucket of rain water to use, and the garage is a disaster zone of building materials meaning the hose is ridiculously difficult to get to (the tap was repositioned into the garage by my husband who said it would be better for washing the car. Has he washed the car at our house? Not once).
Well, it seems that the neglect has paid off, because yesterday I noticed I had quite a few tomatoes ripe for picking and man did I ever. How gorgeous do they look?
The sunshine was fantastic as well. We took a big walk and then sat in the back garden soaking up the rays. Delicious.
Friday, 13 September 2013
Wholesome Food - Pan-Roasted Cauliflower with Pasta in a Tomato Sauce
August/September time is when the tomatoes start ripening in my area. In previous years the weather has been pretty terrible and I haven't ever really had enough ripen at once to do anything really proper with them... other than just eat them as is, of course.
This year has been an amazing summer. Hands down the best one since I've been in Scotland, which is 7 (!!) years. The tomatoes, and the garden in general, have responded happily.
So, this leaves me needing to use up tomatoes at every possible occasion (poor me, right?), and the result has been pretty cool. I'm either making up dishes or turning to the delights of Google to give me inspiration. We have eaten very well these past few weeks, and last night was no exception.
In this weekend's shop, I grabbed a cauliflower. My husband asked why and I told him I'd figure it out later. I'm so glad I did.
Yesterday I googled "tomato and cauliflower" and found a few really amazing sounding recipe ideas. I decided on the Kitchn's Pan-Roasted Cauliflower & Pasta with Tomato-Cream Sauce, with a few modifications.
Serves 4
1 head cauliflower
Pasta - I used about 4 handfuls of whole wheat fusili
1 tin of chopped tomatoes
Fresh tomatoes - 6 large or more if they're small - or if you can't be bothered, just make it two tins of chopped tomatoes
4 pieces of smoked back bacon - this is UK bacon and it's bigger than bacon in the US. If you're using streaky/US bacon, I'd probably use 6 pieces.
1 medium/large onion - I used yellow
3 cloves garlic, minced
Red pepper flakes
Salt
Cheese
Fresh basil, to serve
My primary modification to the Kitchn's recipe was the fact that I used fresh, home-grown tomatoes in place of one of the tins of tomatoes.
I grabbed my ripest tomatoes, tossed them in olive oil, and stuck them on a baking sheet in the (fan assisted) oven at about 150C until the skins split and started to go brown, about 30 minutes.
Once they cooled a bit, I removed the skins and piled them into my mini-blender, before blitzing them smooth. If you decide to just use two tins of chopped tomatoes, I would still blitz one of them. It makes the sauce a bit creamier.
Here's another modification - I used bacon instead of pancetta. I just wanted to use what I had in the house and I pretty much always have bacon in the house. Pancetta, not so much.
While the tomatoes are roasting, crisp up the bacon in the pan where you're going to assemble everything (this is important). I needed to add in a little olive oil to get it started, and set it aside once it was ready.
While the bacon's crisping, chop up your cauliflower into smallish bite-sized pieces.
Here's where it gets amazing/bad - once the bacon is done, whack up the heat on your pan and toss in the cauliflower (be careful of sparking oil when you do this). You're going to cook your cauliflower in the bacon fat. Ooh yeah. Now I should remind you that I'm in the UK so there isn't a HUGE amount of bacon grease in the pan. It's just a bit more oil then I would use if I was only using olive oil. Just include however much grease you want to, and if you want to be super healthy, roast the cauliflower in the oven instead.
Leave the cauliflower undisturbed for about a minute, until the bottoms start to brown up. Stir, and leave again. Keep doing this for about 5 minutes - I like my veggies pretty firm, so if you prefer yours soft, then cook for about 8-10 minutes.
The smell of roasting cauliflower is amazing - almost nutty. Don't write off cauliflower until you've had it roasted, it is NOTHING like steamed. Seriously.
Once the cauliflower's done, set it aside to chill out for a minute.
Finally, dice up your onion and put it in the same pan everything's cooked in, with a glug of olive oil if the pan's dry. Cook until translucent, then add in your pureed roast tomatoes, your tin of tomatoes, your garlic and chilli flakes. Let these all bubble away and reduce a bit together for a couple of minutes, before you finally get your pasta cooking.
Shortly before the pasta's ready, tear up your bacon into the sauce, and add in the cauliflower. Salt if necessary. Finally add in your cooked pasta and stir to combine.
Serve topped with cheese and basil.
TASTY.
This year has been an amazing summer. Hands down the best one since I've been in Scotland, which is 7 (!!) years. The tomatoes, and the garden in general, have responded happily.
So, this leaves me needing to use up tomatoes at every possible occasion (poor me, right?), and the result has been pretty cool. I'm either making up dishes or turning to the delights of Google to give me inspiration. We have eaten very well these past few weeks, and last night was no exception.
In this weekend's shop, I grabbed a cauliflower. My husband asked why and I told him I'd figure it out later. I'm so glad I did.
Yesterday I googled "tomato and cauliflower" and found a few really amazing sounding recipe ideas. I decided on the Kitchn's Pan-Roasted Cauliflower & Pasta with Tomato-Cream Sauce, with a few modifications.
Serves 4
1 head cauliflower
Pasta - I used about 4 handfuls of whole wheat fusili
1 tin of chopped tomatoes
Fresh tomatoes - 6 large or more if they're small - or if you can't be bothered, just make it two tins of chopped tomatoes
4 pieces of smoked back bacon - this is UK bacon and it's bigger than bacon in the US. If you're using streaky/US bacon, I'd probably use 6 pieces.
1 medium/large onion - I used yellow
3 cloves garlic, minced
Red pepper flakes
Salt
Cheese
Fresh basil, to serve
My primary modification to the Kitchn's recipe was the fact that I used fresh, home-grown tomatoes in place of one of the tins of tomatoes.
I grabbed my ripest tomatoes, tossed them in olive oil, and stuck them on a baking sheet in the (fan assisted) oven at about 150C until the skins split and started to go brown, about 30 minutes.
Once they cooled a bit, I removed the skins and piled them into my mini-blender, before blitzing them smooth. If you decide to just use two tins of chopped tomatoes, I would still blitz one of them. It makes the sauce a bit creamier.
Here's another modification - I used bacon instead of pancetta. I just wanted to use what I had in the house and I pretty much always have bacon in the house. Pancetta, not so much.
While the tomatoes are roasting, crisp up the bacon in the pan where you're going to assemble everything (this is important). I needed to add in a little olive oil to get it started, and set it aside once it was ready.
While the bacon's crisping, chop up your cauliflower into smallish bite-sized pieces.
Here's where it gets amazing/bad - once the bacon is done, whack up the heat on your pan and toss in the cauliflower (be careful of sparking oil when you do this). You're going to cook your cauliflower in the bacon fat. Ooh yeah. Now I should remind you that I'm in the UK so there isn't a HUGE amount of bacon grease in the pan. It's just a bit more oil then I would use if I was only using olive oil. Just include however much grease you want to, and if you want to be super healthy, roast the cauliflower in the oven instead.
Leave the cauliflower undisturbed for about a minute, until the bottoms start to brown up. Stir, and leave again. Keep doing this for about 5 minutes - I like my veggies pretty firm, so if you prefer yours soft, then cook for about 8-10 minutes.
The smell of roasting cauliflower is amazing - almost nutty. Don't write off cauliflower until you've had it roasted, it is NOTHING like steamed. Seriously.
![]() |
| bacon-cauliflower goodness |
Finally, dice up your onion and put it in the same pan everything's cooked in, with a glug of olive oil if the pan's dry. Cook until translucent, then add in your pureed roast tomatoes, your tin of tomatoes, your garlic and chilli flakes. Let these all bubble away and reduce a bit together for a couple of minutes, before you finally get your pasta cooking.
Shortly before the pasta's ready, tear up your bacon into the sauce, and add in the cauliflower. Salt if necessary. Finally add in your cooked pasta and stir to combine.
Serve topped with cheese and basil.
TASTY.
Tuesday, 10 September 2013
Wholesome Food - Quinoa and Chickpea Salad
Recently I was on the lookout for a good, hearty salad. A salad that included carrots.
I grow carrots, specifically I've chosen to grow (along with the orange ones) purple carrots. Did you know that carrots were not traditionally orange? They were bred that way by the Dutch. Purple carrots have more antioxidants than the orange ones, and generally look cooler anyway.
The carrots above were still pretty young when I took this picture, but you get the idea (see the two less-cool looking orange ones hiding in there too). They're purple on the outside, and orange on the inside, and a friend of mine commented randomly one day that they must look really cook when you shave them - orange and purple stripey.
That comment became the basis for this "recipe" if you can call a salad a recipe.
I like to use:
Carrots
Kale (curly and as fresh as possible)
Quinoa
Chickpeas
Avocado
Cherry tomatoes
Cucumber
Bacon
Sharp cheddar
Balsamic vinegar
The first few times I made this I used fresh peas as well, but those are past their season now and I really just threw them in to use up the last few pods.
I'm pretty bad with giving people amounts to use, but here's a rough guide that you can fiddle with as you please:
For 4-6 side salads, or one main with 3 lunches
1 tin of Chickpeas - drained and washed
1/2 -1 cup (uncooked) quinoa - I like to cook it in chicken broth
4 strips of smoked bacon - cooked crispy and crumbled into the salad
1-2 large leaves of kale - remove the stems and tear the leaves into small to medium sized pieces
3-4 carrots, with their tops (depending on size and just how much carrot you want to use) - wash them well and then use a vegetable peeler to peel strips off the carrot into the salad. The carrot tops are useful when doing this because it gives you something to hold onto, but it's not imperative.
Toss these all together, add in avocado, tomatoes and cucumber until it looks good to you. At this point I add in a small amount of finely grated sharp cheddar. It gives it a good zing which compliments the sweetness of the carrots. Glug in balsamic to suit. No oil is needed, and while you could use other vinegar, I think balsamic really suits the flavours.
This salad is crazy good. I made it for a friend who is obsessed with salads and makes them constantly, and she told me it was the best salad she had ever had. No joke. It's earthy, and sweet, and a little salty, and tangy, and super healthy and filling. Crazy yum.
The first time I made this I thought it was gorgeous - greens, reds, purples, white/yellow - a true rainbow on a plate. I took a picture and, frankly, the picture looks awful. I tried playing with Picassa to make it look cool and arty but there's no saving it. I'll upload one when I can get a good shot.
I grow carrots, specifically I've chosen to grow (along with the orange ones) purple carrots. Did you know that carrots were not traditionally orange? They were bred that way by the Dutch. Purple carrots have more antioxidants than the orange ones, and generally look cooler anyway.
The carrots above were still pretty young when I took this picture, but you get the idea (see the two less-cool looking orange ones hiding in there too). They're purple on the outside, and orange on the inside, and a friend of mine commented randomly one day that they must look really cook when you shave them - orange and purple stripey.
That comment became the basis for this "recipe" if you can call a salad a recipe.
I like to use:
Carrots
Kale (curly and as fresh as possible)
Quinoa
Chickpeas
Avocado
Cherry tomatoes
Cucumber
Bacon
Sharp cheddar
Balsamic vinegar
The first few times I made this I used fresh peas as well, but those are past their season now and I really just threw them in to use up the last few pods.
I'm pretty bad with giving people amounts to use, but here's a rough guide that you can fiddle with as you please:
For 4-6 side salads, or one main with 3 lunches
1 tin of Chickpeas - drained and washed
1/2 -1 cup (uncooked) quinoa - I like to cook it in chicken broth
4 strips of smoked bacon - cooked crispy and crumbled into the salad
1-2 large leaves of kale - remove the stems and tear the leaves into small to medium sized pieces
3-4 carrots, with their tops (depending on size and just how much carrot you want to use) - wash them well and then use a vegetable peeler to peel strips off the carrot into the salad. The carrot tops are useful when doing this because it gives you something to hold onto, but it's not imperative.
Toss these all together, add in avocado, tomatoes and cucumber until it looks good to you. At this point I add in a small amount of finely grated sharp cheddar. It gives it a good zing which compliments the sweetness of the carrots. Glug in balsamic to suit. No oil is needed, and while you could use other vinegar, I think balsamic really suits the flavours.
This salad is crazy good. I made it for a friend who is obsessed with salads and makes them constantly, and she told me it was the best salad she had ever had. No joke. It's earthy, and sweet, and a little salty, and tangy, and super healthy and filling. Crazy yum.
The first time I made this I thought it was gorgeous - greens, reds, purples, white/yellow - a true rainbow on a plate. I took a picture and, frankly, the picture looks awful. I tried playing with Picassa to make it look cool and arty but there's no saving it. I'll upload one when I can get a good shot.
Sunday, 8 September 2013
Carrots and Baths
Did you know that carrot fly can only fly at a certain height?
I have no idea what height that is, but basically the theory is that carrots are best put into raised containers to that they're protected from carrot fly. Plus, then you have better control over the type of soil they're grown in.
So, in the spirit of upcyling and preserving some of the history of our house, when we ripped out the old bathroom, we kept the old cast iron bath:
It makes a really awesome planter for anything because it also keeps out the slugs and snails.
For drainage, and so we didn't have to use a huge amount of topsoil to fill it, we put broken bricks in the bottom of the bath, covered them with sand, and then filled up with topsoil. In the first year we split it between salad greens and carrots, and the salad survived the Great Slug and Snail Massacre of 2012 completely untouched. But, we loved the carrots so much it's all carrots now.
Now, this thing is HEAVY. It's cast iron, filled with bricks, sand and soil. There was NO moving this thing. Until we realised that it was in the way of the forklift for our extension...
Fortunately, the guys doing our extension are awesome.
I have no idea what height that is, but basically the theory is that carrots are best put into raised containers to that they're protected from carrot fly. Plus, then you have better control over the type of soil they're grown in.
So, in the spirit of upcyling and preserving some of the history of our house, when we ripped out the old bathroom, we kept the old cast iron bath:
![]() |
| We even kept the taps! |
For drainage, and so we didn't have to use a huge amount of topsoil to fill it, we put broken bricks in the bottom of the bath, covered them with sand, and then filled up with topsoil. In the first year we split it between salad greens and carrots, and the salad survived the Great Slug and Snail Massacre of 2012 completely untouched. But, we loved the carrots so much it's all carrots now.
Now, this thing is HEAVY. It's cast iron, filled with bricks, sand and soil. There was NO moving this thing. Until we realised that it was in the way of the forklift for our extension...
Fortunately, the guys doing our extension are awesome.
Thursday, 5 September 2013
This year, 2013, has been pretty full on in terms of health/body type stuff (and it's not even over yet):
I went off birth control
My mom was diagnosed with breast cancer
I got pregnant
I miscarried
I gained weight
I got acne for the first time since I was a teenager.
My mom got a really awesome doctor and breezed through her operation and radiation
All of the above got my brain ticking.
I was already into food. I love food passionately and will never ever be able to diet because, in my (not so) humble opinion, I'm actually pretty darn good at making food and really really enjoy eating it too. Lots of eating of the food.
Along with this love of food came a garden, a big garden. Have you ever eaten a carrot out of someone's garden? It's insane. You have no idea what a carrot tastes like if you've never picked and eaten one. Peas too. Wow. These things are so sweet and amazing that I almost can't bear to cook them.
I had never eaten kale until I grew it. I grew it because my father in law brought me a bunch of seedlings he didn't have space for, and it was one of the only brassicas that survived the caterpillar and slug onslaught of 2012. I now do my best to work kale into as much of my cooking a possible.
I've totally digressed from my point. My point is that I was already into healthy living and eating, but the events from the start of 2013 shook me into starting to look at other ways I could live a more healthy and wholesome life.
So, because the world obviously needs another blog about food/life/healthy living, here I am. In case you're interested.
I went off birth control
My mom was diagnosed with breast cancer
I got pregnant
I miscarried
I gained weight
I got acne for the first time since I was a teenager.
My mom got a really awesome doctor and breezed through her operation and radiation
All of the above got my brain ticking.
I was already into food. I love food passionately and will never ever be able to diet because, in my (not so) humble opinion, I'm actually pretty darn good at making food and really really enjoy eating it too. Lots of eating of the food.
Along with this love of food came a garden, a big garden. Have you ever eaten a carrot out of someone's garden? It's insane. You have no idea what a carrot tastes like if you've never picked and eaten one. Peas too. Wow. These things are so sweet and amazing that I almost can't bear to cook them.
I had never eaten kale until I grew it. I grew it because my father in law brought me a bunch of seedlings he didn't have space for, and it was one of the only brassicas that survived the caterpillar and slug onslaught of 2012. I now do my best to work kale into as much of my cooking a possible.
I've totally digressed from my point. My point is that I was already into healthy living and eating, but the events from the start of 2013 shook me into starting to look at other ways I could live a more healthy and wholesome life.
So, because the world obviously needs another blog about food/life/healthy living, here I am. In case you're interested.
Subscribe to:
Posts (Atom)